Fighting and Disease Preventing Foods

JM Perez By JM Perez2 min read669 views

I started actively reading about Cancer Fighting Food in 1997 when my Father was diagnosed with Prostate Cancer and my research intensified in 2011 when I found out that my former neighbor was in her final stage of Cancer. They are so many disease fighting and preventing foods out there. For this post, I am only naming a few. Click on each one of them to learn about their health benefits (and possible side-effects, if any).

  • Soursop Fruit
    I fell in love with this Juicy fruit back in 1990 without knowing it benefits and without knowing what it was called then. I later found that it was called “Corossol” (its French name).  If I am not mistaken, I believe we had two Soursop trees growing in our front yard and I remember my Mother urging me not to eat too much and too fast. It would be great to have a few trees around here, from the Sweet Soursop.

How to Make/Use Soursop Tea (Source: Nature Chemo Care)

Boil 1 liter of water, then take 15 Soursop matured leaves (fresh or dried ones both have same effect) and 1 small stem cut into small pieces and put into the boiling water then continue to boil the water on medium flame for 30 minutes, until the water evaporates to 600 ml. Now the Soursop tea is ready to drink. Drink 1 cup (200 ml) filtered Soursop tea after cooling or warm, 3 times every day, in the morning, afternoon and in the night. For better taste you can add some honey (not sugar).

After drinking, the body feels the effects of heat, similar to the effects of chemotherapy but no side effects. In 1 or 2 weeks time you can feel the benefits of Soursop yourself, and in 4 weeks time the improvements can be checked with the doctor.

Note: every time you drink Soursop tea see that 30 minutes before and after, you don’t take any other food. Do not use it during pregnancy. Do not use in large single dosages and avoid long-term use.

Click here and here for additional information about this fruit. Click here for some delicious Soursop Fruit Recipes.

S.O.T.S. Divider

Source: OneGreenPlanet.org . MDAnderson.org . AllHealthNet.com.

Click here, here and here for more information on Disease Fighting Foods.

DIY: Sprinkler Robot Sculpture

EPEngineer By EPEngineer2 min read974 views

On a Saturday morning while in the garage organizing, we found some of the sprinklers that had been used on the home and which I replaced to run a Drip Watering System instead. They where not much by themselves but gave me an idea which had been working itself on my head for a while. I knew what I wanted it to look like and after talking to my son about it, We decided that it should stand on our front yard and that the eyes and chest should light up (Like Iron Man).

I used plastic piping for the fingers, some of the skinnier sprinklers for the arms and the thicker sprinklers for the legs. To screw everything together I used a drill bit to make a preliminary hole to make it easier to screw the pieces together easier. All together it took about 6 to 8 hours to assemble which some of that time used up by trial and error on part placement.

For the electronic part of the project I decided to use a Solar Light that I got from the local 99¢ Only Stores and which I hacked into to remove the LED and be able to run 4 LEDs from it. I placed all 4 LEDs in parallel and gave them plenty of wire to be able to run them from the Chest all the way to the Head for the eyes. I also attached a second battery holder in parallel to provide the system extra power.

Sprinkler Robot Sculpture.

My boy really enjoyed working on the project as well as working on the routing of the wiring which he called “Open Chest Surgery”. As you can see from the picture, the bot stands at about 4 foot.

Enjoy!

DIY: Shovel Door Handle

EPEngineer By EPEngineer2 min read1.7K views

This is one of the first projects I worked on when we first bought our House in 2007. The original gate latch fell apart and we needed to keep the gate closed at all times. It is a fun and simple projects to do. It is so easy to maneuver and latches every time you push the gate closed behind you.

Materials Needed:

  • Shovel, Pitchfork, Rake, Hoe, Harrow, Fishtail Hand Weeder (or any garden tool with a wooden handle)
  • Screws
  • Gate Latch
  • Cable Rope
  • Drill and a Drill Bit (to make the holes)
  • A Spring (for pulling the Shovel)

Step by step:

  • First step is to use the drill and drill bit to make a hole that will allow the cable rope to go from the latch to the opposite side of the fence. Try and make the hole slightly bigger than the cable wire diameter since it will need to move freely back and forth.
  • Attach the cable rope to the gate latch and run it thru the hole you have drilled. Now choose the area on the object you want to use as the handle and line it up to the cable rope. Make sure that when the object gets pulled, the cable rope will move the latch open and closed freely.
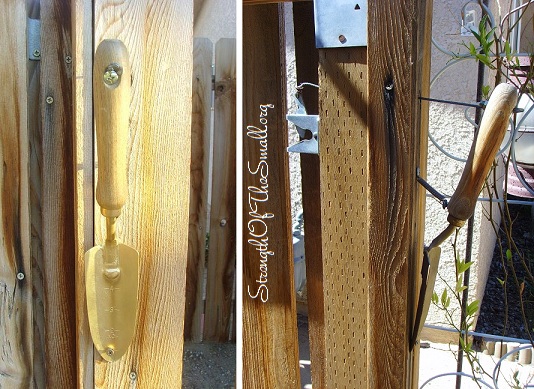
  • Use the screws to screw the object to the fence. Once it is fastened to the fence, use the spring to calculate how far the object will be off the fence. As you can see from the picture I decided to place the spring lower on the gardening shovel to have it sit at an angle.
  • Screw the spring to the fence and then to the object. Once done you are ready to attach the cable rope to the object and test it. After pulling on the handle it should pull the latch open. When you release the handle the spring will pull the handle back in place and the latch will go down far enough where pulling the gate close will latch it closed.

Wrenches can be used as door handle as well as other tools. All you have to do is use your imagination.

Shovel Door Handle.

Make sure you apply clear coat on the wood handle to give a clear and shinning finish and most importantly, to protect the wood from scrapes, the weather and also to help it last as long as possible.