Home Improvement

Nature at its Best in the High Desert

JM Perez By JM Perez2 min read416 views

It’s always a blessing when the Universe conspire in one’s favor as it was the case for us this weekend.
The weather was at its best and we finally (5 years later) completed one of my most important projects in the backyard, which is privacy. The front yard and the sides of the house are covered, all we needed was something for the far end of our backyard, which was overlooking a huge empty lot. We chose Chain Link Privacy Slats.

I planted more gorgeous flowering bulbs yesterday, including Belladonna Amaryllis, Pink Impression Tulip and Ice King Double Daffodil. The pictures below are a few of my fragrant roses from the front yard. I picked a few yesterday to make a centerpiece and I pruned most of them.
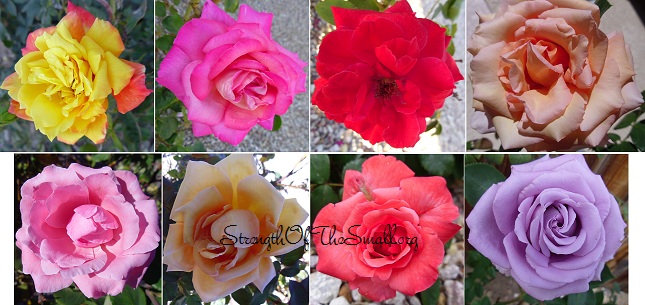
Beautiful Fragrant Roses. Find their name on Pinterest.

Below are some Fall colors in my Garden. The leaves on my Raywood Ash tree are slowly changing too.
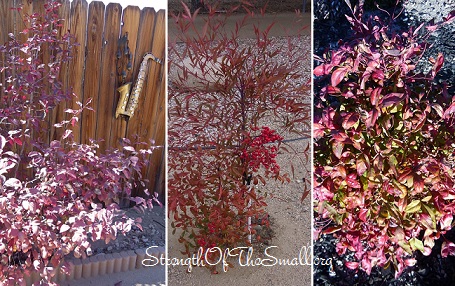
Purpleleaf Cherry Plum . Heavenly Bamboo . Burning Bush.

The plants and flowers are thriving in the garden and the bees are busy collecting Pollen. It was fascinating watching them go back and forth as I was carefully taking pictures. Click here to learn more about Bee Pollen.
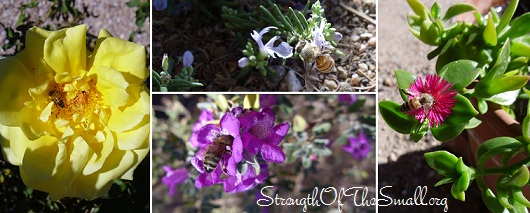
Honey Bees Collecting Pollen.

Since the beginning of the month I’ve seen quite a few Grasshoppers in my garden. As fun as they are to my kids, who enjoy watching them hop around; I am beginning to worry about their number and looking into Organic Pesticide to get rid of them. Click here or here to learn more about Grasshoppers and how to control them and click here to learn about some of their usefulness (serving as food for birds, for instance).
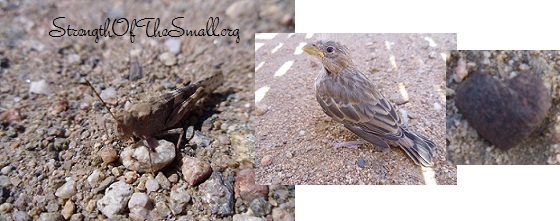
Seaside Grasshopper . Baby Bird . Heart Shaped Stone.

The best part of the day was video conferencing on Skype with the Family in France. My Parents traveled late last month to attend the Graduation ceremony of my big brother. The kids (cousins) got to see each other and talked to their grandparents, uncle and aunt. They even got a sneak peek at some of their Christmas gifts.

I am happy that everyone is safe and having a good time. I am looking forward to a peaceful week ahead.
DIY: Plexiglass on Tree Trunk

EPEngineer By EPEngineer2 min read726 views

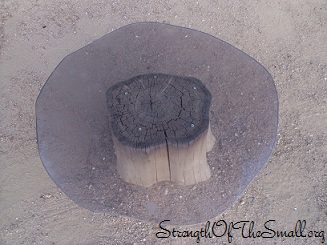
About 3 years ago I came across a piece of thick plexiglass which I knew that I wanted, but did not know what to use it for. Time passed and about a month ago, while cleaning the garage, I came across it again. This time I decided to file down the edges to round them off and make it usable. As luck would have it, I needed to place it on a surface to round it off and after looking around for a bit; found myself a tree trunk that was the perfect size.

An hour later and the piece of plexiglass was ready to use and while looking at it from different angles I found my answer. “A TABLE”. I used wood screws to drill it down to the plexiglass and used a drill bit to make the holes on the plexiglass to not crack it. Here is the result. I hope you enjoy it.

Table made with Plexiglass on salvaged Tree Trunk.

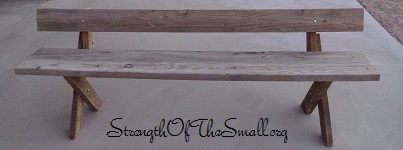
After numerous trips to Lowe’s and Home Depot, my wife asked me once again to make her a Primitive Wooden Bench. I had spotted a couple of choice piece on a pile of used wood behind our garage and now was the time to fish them out. I had seen the leg pattern from other benches and knew what they looked like, so I started with them. Once I got the correct angle in place, I cut two pieces of each for the legs and screwed them together to verify the angle.

Once done with the legs I started working on the sitting part and the back rest for it. This two pieces where cut the same size and rounded off to eliminate the possibility of splinters. I used to pieces to unite the back rest to the legs and the rest is history. You can see for yourselves the end result.

Reclaimed Wood Bench.

Enjoy!

DIY: Wine Glass Lamp Shades

JM Perez By JM Perez2 min read973 views

What would you do if, suddenly, a few of your favorite wine glass broke? My guess is that most of us would toss them in the trash can. Others like me, who collect objects with sentimental value will find it difficult to part with them. We would find ways to repurpose/ reuse these objects in hopes of holding on to them and/or extending their lives.

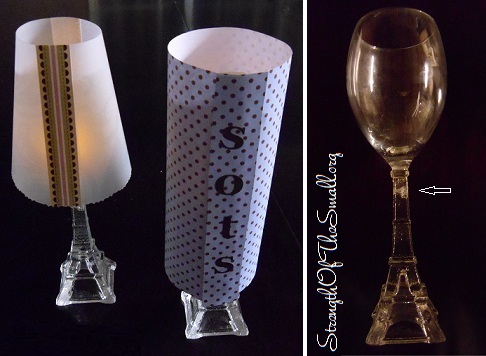
A few months ago, I purchased a set of Eiffel Tower Wine Glasses from which two were broken. I refused to part with them and decided to store them in a safe place until I figure out what to do. This evening we had family craft time. While the kids were working on their projects, my husband used Loctite Epoxy to reconnect the glass handle to its base. I was busy creating and decorating the lamp shades. Now we have a new use for them.

Wine Glass Lamp Shades.

Materials Needed:

• Wine glasses
• LED tea lights
• Scrapbook paper (8-1/2″ x 11″)
• Scissors / Decorative bladed scissors
• Glue pen/ Double-sided tape

Step by step:

1. Be creative and design our own template OR print out this template (by Good Housekeeping).
2. Trace the pattern onto your scrapbook paper. Cut out the shape with your regular scissors (use decorative bladed scissors along the bottom edge to add another element to the shade).
3. Use the glue pen or the Double-sided tape to one straight end. Wrap the other end over and hold together to form the shade.
4. Set the lampshade on top of your glass and voilà!

DIY: Medicine Cabinet Makeover

JM Perez By JM Perez1 min read2.4K views

Most of us have at least one Medicine Cabinet in our home. It is an area where we store our everyday essentials for quick access, such as toiletries. If like me, you bought an older home, then I am sure, it came with one of those old school Medicine Cabinets (plain with silver or gold metal frame around it). There’s absolutely nothing wrong in having one of those as long as it’s been placed at the right location.

In my case, I didn’t like the location of the Medicine cabinet, which was placed on the left wall. After all the turning to look at the mirror it took a toll on my neck and it was time for the cabinet to go.
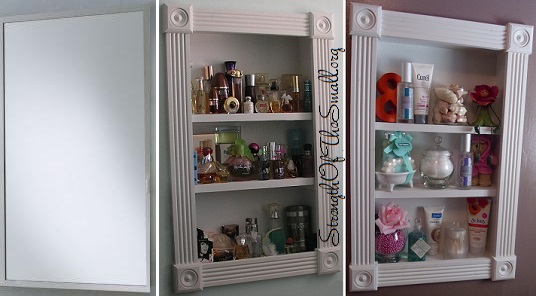
I started by removing the screws from the inside panels of the cabinet and then I pulled it free from the wall. I build my recessed shelving then I installed the shelves and trim.

Medicine Cabinet as Display Cabinet.

It’s a fun and very simple project which can be accomplished in just a couple of hours.

Our Front Yard Landscaping

JM Perez By JM Perez2 min read774 views

Today has been such a wonderful day. We were able to accomplish so much, all thanks to Mom’s babysitting services. She is and has always been a tremendous help when it comes to lending a hand.

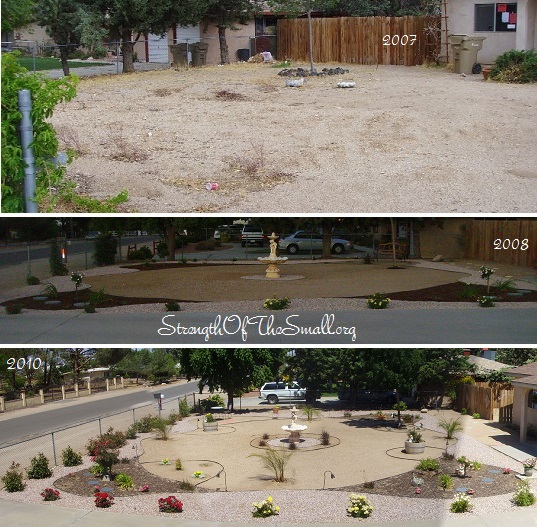
We now have some Before and After pictures of the front yard landscaping to share with you (the pictures speak for themselves). Those of you who visited with us have seen some of the progress we’ve made around our Home and while there’s still much work to be done, we will take a break for now.

I purchased a couple of Phoenix Roebelenii (Pygmy Date Palm Tree) a few days ago and planted them. I know they will look lovely in a few years and add so much charm to the yard if they survive the Winter.
We are still debating about whether to grow grass (perhaps installing synthetic grass), using stepping-stones or just let the middle section as it is (plain dirt). After all, isn’t the yard colorful enough?

Front Yard, Left.
Front Yard, Left.

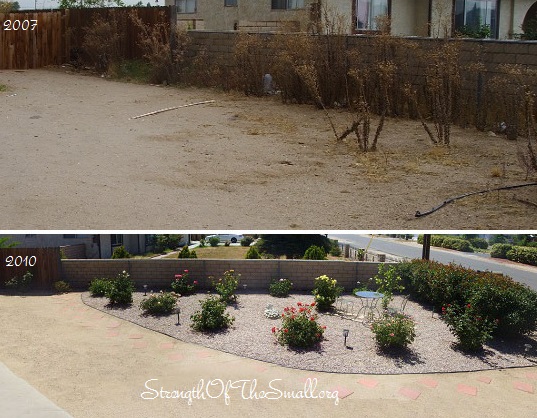
Do you see the dried plants below? Those are weeds. It saddens me to know that a family with children once lived here and never thought about getting rid of those dried and ugly plants. This is a front yard for goodness’ sake! Forget for one minute about what the neighbors think of you and how much you will have to pay in fines for being careless. How do you feel going home? Those things right there are a fire hazard.

Front Yard, Right.
Front Yard, Right.

We are changing the exterior appearance of our Home one day at a time. We purchased the gravel from The Rock Yard, the garden edging from Big Lots! My husband surprised me with the Cherub Fountain and we did the work ourselves. The next outdoor project will be the backyard landscape and continued clean-up.

Happy Gardening!